Monday, July 31, 2017

Makeup Storage

I’ve stored my makeup so many different ways. When I was living at my parents house I stored it on my desk shelves in a small makeup bag. I would literally have to dump the thing out every morning and put it all away when I was done - how inconvenient. From there I upgraded to a small jewelry organizer. You know those things that had about three sections and were all the rage at Marshalls? I actually still have one, but I use it for a much different purpose. When I moved out of my parents house and into our first apartment I was lucky enough to get a makeup desk. This is from ikea and I really love it! I used the drawers to hold my makeup and these clear organizers to keep everything in its place. That worked for a while, but as my makeup collection continued to grow I started to outgrow the organizers.

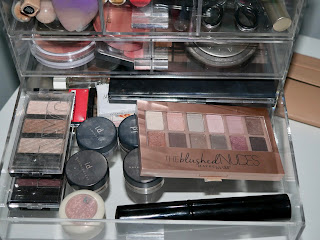
I have always loved the acrylic makeup organizers and finally got my hands on this one. My husband got it for me for my birthday and I instantly fell in love with it. All of my makeup fit perfectly in it and it has been much easier to access it as I get ready. I cleaned out all my makeup before putting it away in it’s new beautiful home and gave all the things I didn’t want/need anymore to my little sister. She was SO excited and has been wearing it every time I go visit her, she’s too cute!

I bought this lipstick organizer from Marshalls and have linked a similar one here. Before I stored my lipsticks in one of those clear organizers in my desk and I could never find what I was looking for. I had to dig around and usually ended up picking whatever was on top to use. Now I am able to see what options I have and if my collection continues to grow, which let's be honest will happen, I would definitely purchase another one and keep it on my desk.


How I organize my makeup


The bottom drawer is the deepest so I store all of my primer, foundation, and setting products there. Lots of times powder packages can be much larger so this is a great spot for them. I also store my beauty blender there so it does not get squished.  


The next drawer is where I store all my shadows and shadow palettes. I will be honest, I have a lot of shadows and I do not utilize them enough. As a teacher, I feel a little self conscious if I wear my eye makeup a little darker but this year I am not going to let that stop me. I am not going to go all on dark smokey eye but I want to play more with colors!


I love the next drawer because it is split into two sections. On the right side I keep my bronzers and highlighters. I’m in the market for a new bronzer, if you know of any please let me know! I’ve heard great things about this one. On the left side I keep my beloved blushes. I LOVE blush. I have a new one coming in the mail this week that I am really excited about. It has amazing reviews and the best part is that I purchased it on Amazon - score!
 The last drawer is split into three sections, which ended up working out so perfectly. I am telling you, this acrylic box was made with me in mind! In one part I keep all of my concealers. I feel like I am constantly buying new concealers because there are a lot out there. This one and this one are my two favorites but both for different reasons. The It Cosmetics one is very thick and has great coverage whereas the Maybelline instant age rewind is very light and typically doesn't crease on the undereye. In another section I store all my mascaras which are probably my second favorite beauty product. 
  The top of the acrylic box lifts up to reveal six small storage sections. This is where I keep all of my sample products. I used to subscribe to Birchbox, which I loved and I am not sure why I didn’t resubscribe. Every month you get about 5-6 beauty samples for only $10! I found some of my favorite beauty and hair products this way.  

That’s how I store my makeup! I am thinking about getting another acrylic box to store all my jewelry in. Right now it is in a beautiful wooden jewelry box but it doesn’t fit in with my style anymore. Do you have any favorite ways to store makeup or jewelry? Stay beautiful! 


Friday, July 28, 2017

Juicy Garlic Burger with Sweet Potato Buns

Summer means lots of cookouts which could lead to an overload of greasy foods wrapped in carbs. I typically don’t eat frozen burgers because I just don’t love the taste of them. But I do love homemade burgers, especially when my husband grills them on the grill - as if that wasn’t obvious, where else would you grill?! If you love getting together with friends and family but hate the way you feel after you gorge yourself full of unhealthy (but usually oh so tasty) food, then this recipe is for you!
I make my burgers using ground beef, worcestershire sauce, garlic powder, salt, and pepper. That’s it. They are SO delicious. The flavors of the garlic and worcestershire sauce go perfectly together. I like to top my burger with an over-easy egg which will shock my father. As a kid, I hated cooked egg yolks. The chalky texture and yellow color really freaked me out. As an adult I still hate cooked egg yolks, I even throw them out when I make hard-boiled eggs (insert monkey emoji covering eyes). I do however enjoy a runny egg yolk on my burger. I find that the soft egg yolk has much more flavor than it does when it is cooked. Anyone else feel me? On top of the egg I place a few slices of avocado. My favorite is when they are perfectly ripe and soft to the touch - excuse me while I wipe the drool off of my chin (LOL).
Now I usually skip the bun and wrap my burger in lettuce to take its place. However, I recently received the Whole30 book as a gift (thanks babe) and I found these sweet potato buns. I really like the flavor that sweet potatoes have because you can eat them plain or dress them up, both equally scrumptious. These were seriously so easy to make. All you do is heat up some coconut oil in a pan, fry the thickly sliced sweet potatoes on each side for about 4 minutes or until tender, top with a little bit of salt and voila you have a way healthier version of a classic bun for your burger. My burger was so large that I had to use a fork and knife to eat it but my husband dove right in and ate it like a typical burger. I wish I would've gotten pictures of it because it was quite hilarious.

I am always joking with my friends about how my husband is a very picky eater. Whenever I make something new his response is typically “great” and it is filled with somber undertones of sarcasm. I was anxious to hear his thoughts on these buns and to my surprise he loved them. He even ate the leftovers! If you have a picky eater, I encourage you to keep trying new recipes and foods with them. I’ve introduced foods to Jay that he never thought he would eat in a million years. Preparing fresh foods and cooking them correctly really makes such a difference when it comes to flavor.


How do you dress up your burger or make cookouts a healthier place to eat? Happy eating!

Thursday, July 27, 2017

Everyday Glow Tutorial with Video!

I'm trying something new, a video! I was hesitant to make a tutorial at first, but with lots of encouragement it is finally here! In this video I feature my go to glowy look that keeps me looking fresh and dewy. I love this look because it is easy but looks glamorous. Watching makeup videos can be intimidating because there are SO many different kinds of makeup out there and all at different price points. The makeup I used in this video ranges from drugstore to department store but is all pretty reasonably priced. I use the makeup that works for me and you should too. I encourage you to try new things and don’t be afraid to mix it up! All the products I used are in the description bar of the video. Stay beautiful!

Tuesday, July 25, 2017

Fruit Pizza


Desserts can be hard to resist at cookouts and parties, which is why I usually offer to bring one. This way I know what went into it and how much I can have, based on the ingredients. My grandfather has diabetes and so I try to make desserts with little to no sugar, which is why a lot of my recipes use honey. That being said, this is a recipe I would not make for my grandfather because although it is loaded with fruit, it does have sugar in the “dough” part of the pizza. I’d love to try making this again using coconut sugar instead. If I do I will add the update!


This fruit pizza is absolutely gorgeous. I am not trying to toot my own horn but even I was impressed by how beautiful it looked when I was done. I am not going to lie, putting the fruit on top of the cookie dough was very time consuming. I think in total, between slicing the fruit and placing it on the cookie, it took me about 30 minutes - yikes! If you’re looking to impress a crowd, this is how to do it. I brought this to a pool party so I tried to use different colors of fruit to make this pizza pop!

Here are my tips when making this fruit pizza.
  1. Room temperature butter and cream cheese. I am always so bad about taking out butter and cream cheese ahead of time. For this recipe these ingredients really need to be at room temperature for them to mix well with the other ingredients. No worries if you forget (like me) just pop it in the microwave for a few seconds until soft to touch - but don’t melt it down to liquid!
  2. Make the dough and bake it the day before. You should chill the dough for about 30 minutes to an hour and then bake it. To ensure that the cream cheese frosting doesn't melt all over the place it is helpful for the cookie dough to be nice and cool.
  3. Bake on flat cookie sheet with parchment paper. This will make taking the cookie off so much easier. It is a little soft in the center so it can crack easily. By using a flat cookie sheet, you can slide it right off without having to worry about picking it up.
  4. Double the dough or cut the frosting in half. I ended up having so much leftover frosting and fruit that I could have easily made another fruit pizza. It is a hit so don’t worry about having leftover pizza, people will eat it!
  5. Cut the pizza prior to the party. This is a funny one. I brought the pizza to the party I was attending and no one was eating it. I was starting to get worried but then realized people thought it was too pretty to cut into. Once I sliced it up, the pizza literally disappeared within the hour!

You can find the recipe here. I hope you enjoy this delicious fruit pizza! Happy eating!

Monday, July 24, 2017

Skincare Routine


I wish I could go back in time and tell my 18 year old self how important skincare is. I never used sunscreen on my face (I am cringing writing that) and I always went to bed with makeup on my face. Thankfully, I woke up at 21 and realized I didn’t want wrinkles by the age of 30.

I shared in this post that Tula is one of my favorite beauty products. I have been using it religiously for about a year and have noticed a few changes in my skin, all for the better. The best part about these products is that they are anti-aging and full of probiotics to keep your skin happy and healthy. Tula has a lot of other products and some more specific for wrinkles. I have my eye on this product.

I use two different cleansers at night. I use this one by Clean&Clear and then my Tula cleanser which I cannot speak highly enough about. I use it every night and sometimes in the morning if my face is feeling oily. I typically don’t wash my face in the morning with a cleanser that is how good this stuff is. I use the clean and clear to take off all my makeup, and I could probably skip this step but I have been using this stuff for years and I am not ready to say goodbye to it yet. It helped clear up my face during high school and I have just continued to use it, as I have gotten older. 

I usually just use my hands to apply and lather the cleanser but Jay got me this cleansing brush for my birthday and I am obsessed with it! I have been using it every night since I got it and my skin is feeling a lot softer, and it hasn’t even been a whole month of using it yet! I have gotten so many compliments lately on my skin and I have to give that brush the credit.

On top of my new cleansing brush I have recently started using a toner by Tula. Typically toners burn my skin because of the alcohol in it, but this one has little to no alcohol in it and leaves my face feeling squeaky-clean. This toner is supposed to balance the PH in your skin to give it a more even tone and texture. I use it after cleansing my face and I’ve only been using it for about 2 months but my skin definitely feels more hydrated and the coloration is a lot more even.

After I let that soak into my skin I lather my face with this hydrating cream by Tula. I love this product because a little bit goes a long way. I usually use about four fingertip size amounts to do my face. This cream is so light and I don’t have that greasy feeling on my face after I have applied it. In the past I have used this clean and clear lotion, which if you can’t splurge on a face cream this is the one to get. It is a little bit greasy but it hydrates your face very well and never made me break out.

What are your go to cleansers and products to keep yourself looking youthful? Stay beautiful!

Friday, July 21, 2017

Quick & Easy Breakfast Ideas


It can be hard to make a healthy breakfast when you’re trying to rush out the door, trust me I know. It can be even harder when you feel as though you aren't the best cook. I’ve gotten a lot of requests to do a post about simple breakfast ideas for the un-mastered chef. Breakfast is one of the most important meals of the day so it’s imperative to kick-start your day with some healthy nutrients for your body.

I am obsessed with avocado. There was about a month stretch where I would literally have it with each meal of the day. It’s so good for you because it’s packed with vitamins and healthy fats that keep your body fueled. I found this great tool for cutting, pitting, and slicing avocados. Especially for all my clutsy friends out there who may be accident prone, I highly suggest this. Having said that, avocado toast is one of my favorite breakfasts and super quick to make. Sometimes I will use my pampered chef ceramic egg cooker but other times I like to just fry my egg. I slather half of the avocado all over the toast and then put the egg right on top - yum!

An even easier breakfast is toast with peanut butter and banana. I like to use oatmeal bread as my toast for breakfast. I did a post all about oats that you can read about here. When I am literally crunched for time in the morning, a good old fashioned toast with peanut butter and banana is my go to.

If both of those don’t tickle your fancy, smoothies are also a super easy option. I made this smoothie with about a half of a cup of coconut milk (I know you’re shocked), almonds, and a frozen banana. That’s it. So simple! I recently purchased this and have been putting it in my shakes. It is a collagen peptides protein powder that is supposed to help with hair, skin, and nails. I haven’t used it long enough to say if it is actually working but the reviews for this are amazing. Cheers to looking youthful!


I hope these simple breakfast ideas will get you thinking about ways you can incorporate healthy foods into your diet. Happy eating!

Thursday, July 20, 2017

Perfect Nude Lip

I think every woman is on the hunt for the perfect nude lip. Does said thing even exist? There are so many colors and brands out there that I am not sure it is possible to definitively say “yes I have found it!” Today I am telling about my four favorite nude lip colors that are pretty close to being perfect.
Let me preface this by saying what works for me, may not necessarily work for you. The nude lip color that looks best on me has more of a peachy undertone and subtle hints of pink. I picked two lipstick colors and two lipgloss colors that I think you will love! The best part about the lipgloss is that they will look beautiful on almost every skin tone. The lipstick comes in shades that are marked by numbers so if your skin is more fair than mine just go down a number or two. If you have a darker skin tone than mine I would recommend going up a number. On to the nudes!
This Anastasia lip gloss in the shade butterscotch has such sentimental meaning to me. I bought this color with my best friend Leah and we loved it so much we both ended up wearing it on our my wedding days. It’s only fitting that we both wore it because we’ve gone through every milestone together - love you girl! This gloss is so creamy and a little goes a long way. I usually blot off the excess because if you use too much it can come out looking very white. I love to put this on top of lipstick too to add an extra shine.
NYX glosses are my favorite. I love how small they are and the size of the wand that comes with the gloss. I used this butter gloss in the shade fortune cookie. This is a very sheer gloss but I would still consider it a nude. It has a very light pigment but picks up enough color so that it does look subtly different than your lip color. It adds a high shine and lasts for quite a while. I also have the shade creme brulee which I adore. You can always find at least one of these in my clutch.

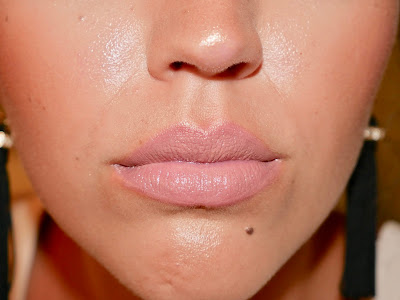
I love covergirl and maybelline lipsticks. I like the price point and the creaminess of the actual stick. It doesn't have the long wear like a pricier lipstick or lip stain might but I am okay with that. I am constantly putting on chapstick or gloss to keep my lips moist anyways. This shade is 235 Champagne. This has more of a pink hue to it and feels so flirty and fun.

This Maybelline Nude Lust 920 is gorgeous. The color looks so natural and gives a more sophisticated look. I could wear this to work without my students asking “what is on your lips?” or saying “Mrs. Ferrando you look so different!” Leave it to 7 year olds to tell it how it is. If I’m having a bad hair day and hoping no one will notice, they will call me out on it. I love- and loathe- how honest and unfiltered they are at that age.

I hope these help you on your hunt for the near perfect nude lip! My next mission is to hunt for the perfect pink lip. I have so many pinks but I feel they just look so artificial on me. Any suggestions? Stay beautiful!

All opinions are my own.

Wednesday, July 19, 2017

Food Prep for the Week

Food prep. This can be an intimidating phrase if you’ve never prepped food for a longer period of time. I know that when I first started prepping food I felt very overwhelmed and didn’t know where to start. Lucky for you, I’ve gotten the hang of things and I am here to share with you some tips and tricks to food prep!
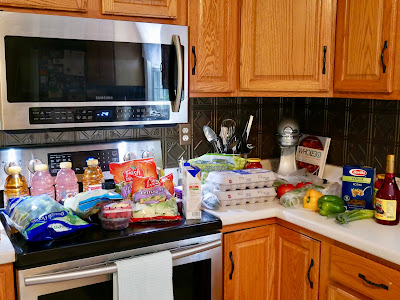
The first thing you must do prior to going to the grocery store is make a list. I find that planning out all meals and making sure my pantry is stocked is really helpful. I keep a running list on my phone of what I need. I am constantly writing notes and reminders on my phone or I would never remember a thing! Bless you iphone, I would seriously be lost without you!

After you have the list it is time to shop. I do most of my grocery shopping in the produce section and then stock up on things like eggs, coconut milk (you know I can’t do without that), flours, and canned goods. I like to keep yams, beets, corn, and diced tomatoes on hand for easy nights. Sometimes I run out of vegetables for dinner by the weekend and so these come in handy.
When I get home the first thing I do is clean out my fridge. This is a step that can be so easy to overlook. I go through my produce drawers and chuck anything that didn’t get eaten. Often times it is things like half an onion, a piece of fritatta or the prior night’s leftovers. I like to do this for two reasons. It keeps the fridge smelling good, and it keeps my fridge more organized. Since I am about to load it up with lots of containers, and empty fridge is much easier to rearrange than a full one!

I typically wash all my fruits and vegetables, even if I am not cutting them up. I like to put them in small glass containers to store them in the fridge. I got these at Marshalls and I am so happy I did. They don’t absorb the smell of onions or get stained from berries. I recommend investing in some of these. I found some similar here.

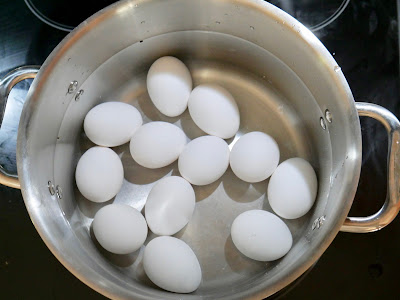
I also hard boil a dozen eggs and make a batch of muffins for Jay for breakfast. I know what you’re thinking; Kayt - that is a lot of work after a trip to the grocery store! I know, I know but it is 100% worth it!! By putting in the hour of food prep I save myself so much time when I go to make lunch and dinner the rest of the week.

Let me know if you do food prep. What are your favorite things to prep? Any suggestions? Happy eating!

Tuesday, July 18, 2017

Top 5 Beauty Products

I love makeup. It’s another passion of mine that I would love to share with all of you. Makeup is a wonderful thing. It can make you feel more beautiful and put together all at once. I am always on the lookout for new makeup and enjoy trying products others have reviewed and recommended.

I really do love all of my makeup but when it came to picking out five items I really wanted to share, I knew exactly what I wanted to feature. These products are something that I use everyday and have repurchased multiple times. I like when a brand shows consistency in their products so I wasn't surprised to find that the products I am featuring are consistent in my makeup collection.

The first product I’m going to talk about is Tula. This skincare has changed the way I think about my skin. Tula is a skincare that has been developed and tested by dermatologist Dr. Roshini Raj. You can read all about her story here. Basically this is a skincare developed using probiotics to naturally balance and boost the health of your skin. This stuff is gold. My skin is so much more radiant and extremely soft after using this product for over a year. I cleanse with the cleanser nightly and follow with the toner and then the lotion. They have a bundle that you can purchase which includes all three items, this is a great buy! I highly recommend this if you are looking for a new skin care. It is a little pricey but well worth the cost.
The next item is a primer. I never used a primer until I found this one. I absolutely adore this Becca backlighting primer. It highlights the skin and gives a healthy and natural glow all throughout the day. I first tried this product about a year ago and have purchased it three times already. If you love the glowy and dewey look, you will be hooked on this one.

Last year I was all about a matte look but I have been loving the natural glow - hence the primer mentioned above. I was so excited when I saw that L’oreal had come out with the Infallible Pro- Glow foundation. I love this product for two reasons: it’s lightweight and it lasts all day. I am so guilty of touching my face throughout the day, even though I know it can be so bad for your skin. When I am stressed or really concentrating on a task my hands go right to my face. This foundation doesn’t wear off and keeps my skin looking fresh.

Prior to my wedding last July, I really started playing around with my makeup and watching Youtube videos on how to do certain looks. I came across Jaclyn Hill and have ever since been obsessed, so it should be of no surprise when you hear that my next product is something she created with Becca Cosmetics. This palette is something I use on the daily and I am so bummed that it is no longer sold. Not to worry! I mainly use champagne pop, which you can buy alone and the mineral blush, which is also sold individually but not in the same shade. I think that all of the Becca blushes are amazing no matter what color you pick. I have my eye on this one.

The last product I am going to mention is the L’Oreal Voluminous Mascara. This is a recent purchase, but I have used all kinds of L’Oreal mascaras prior to this one. I only wear fake lashes for very special occasions so I need a mascara that is going to enhance my natural lashes. This product lengthens without getting clumpy and even does my fine lower lashes. This is a great product. I really want to try this one, as I have heard it is a great dupe for Too Faced Better than Sex mascara at a much cheaper price. I really can’t justify spending over $20 on mascara because I am constantly trying new ones.

I know that was a lot to take in all at once. I would love to do a tutorial or go more in depth with more of my beauty products. Please let me know if this is something you would like to see more of. Stay beautiful!

All opinions are my own.

Monday, July 17, 2017

Ratatouille

This weekend I have to admit that I overindulged a bit. Between barbeques and family get togethers, my body is definitely craving some clean meals this week. I sit down on Sundays and plan out my meals for the week. It is the best way to keep on track and hold myself accountable. I found this pad at Marshalls for a few dollars and it has been the best thing.

I do a lot of food prep on Sundays as well. This makes it so much easier when it comes time to either run out the door with breakfast in hand or whip together our meal when I get home from work. I like to chop all my vegetables, fruits, and make breakfast for myself and Jay for the week. I shared this recipe which will be on repeat for my breakfasts for the next week, or two. For Jay I always make this. I swear he will never get sick of those muffins!
The recipe I am sharing today is another from Whole30. We had this for dinner last week and it was a hit! I loved all the veggies combined with the garlic and tomato sauce. This is a recipe I will use again as it is a perfect side dish for any meat. I paired it with chicken meatballs, but I think it would be great with a perfectly grilled steak - yum!

The best part about this dish is that it cooks in one pan. I love when I don’t have to use a thousand dishes to cook one thing, it just makes my life so much easier. Don’t get me wrong, I make things all the time that make my kitchen look like it's been attacked by every pan and cooking utensil in the house, haven't we all?? You’ll love this dish. It’s simple and delicious - what more could you ask for?
I did chop all my veggies and put them in bowls prior to cooking. I found that it was a lot easier to dump the bowls into the hot pan rather than scrambling for what was going in next. I put the onions in one bowl, the zucchini, yellow squash, and eggplant in another bowl, and then the orange and green peppers in the last bowl. Since they all went in at different times it helped the cooking process, and myself, keep organized. I like to think of cooking as organized chaos. 

How do you decide what meals to make? I’d love to do a post on meal prep. Let me know if that is something you’d like to see! Happy eating!


print recipe

Ratatouille
Ingredients
  • 1/4 cup coconut oil
  • 1/4 finely chopped onion
  • 1 cup diced zucchini
  • 1 cup diced yellow squash
  • 1 cup diced eggplant
  • 1/2 tsp salt
  • 1/2 tsp black pepper
  • 1/2 cup finely diced green bell pepper
  • 1/2 cup finely diced orange bell pepper
  • 2 tsp (2 cloves) minced garlic
  • 1 cup tomato sauce
  • 1 tsp balsamic venegar
  • 3 basil leaves (for garnish)
Instructions
1. Heat pan with coconut oil.2. Add the onions and cook until translucent (about 3 minutes). 3. Add the yellow squash, zucchini, and eggplant. Season with salt and pepper. Cook for a few minutes, stirring often.4. Add the finely diced peppers. Cook for about 2 minutes. 5. Add the garlic and cook until fragrant (about 1 minute).6. Add the tomato sauce and water. Let simmer on low heat for 20 - 25 minutes or until the vegetables are tender. 7. Serve with meat or eat alone.
Details
Prep time: Cook time: Total time: Yield: serves 2

Recipe from The Whole30: The 30-Day Guide to Total Health and Food Freedom