Wednesday, August 30, 2017

Oatmeal Chocolate Chip Cookies

My life just got a whole lot busier this week. With school starting next week, us teachers have to go back and organize our classrooms, enhance our learning with professional development, and of course catch up with all our teacher friends. It really feels like we just left for the summer and now we are back, pretty much in full swing. Needless to say I am exhausted! I am going to try and post 2-3 times a week because I really love writing and sharing food and beauty tips with you all!
Today I am sharing this amazing oatmeal chocolate chip cookie recipe. These cookies are fluffy, chocolatey and made with no refined sugar or flour. They were an absolute hit at a cookout we hosted and I think I’ve made them three times since then. Here are some helpful tips when creating these bad boys:

Refrigerate the dough
I always skip this step when I make a cookie recipe because what's the point, right? Wrong. I was SO WRONG. If you make these cookies without letting them chill in the refrigerator for at least an hour, your cookies will come out very flat. I tested it for the non-believers out there. I whipped up a batch last week, and while the cookies were still scrumptious, they came out so flat, I mean pancake flat, paper flat....you get the point? If you listen to nothing else I say in this post, just take this tip.

Make a double batch
Because these cookies are so good, you will want to make a double batch. The recipe yields about 12 cookies, which is fine if it is just for your household, but I suggest to up the anti. I love to have these cookies warm and served with vanilla bean ice cream- yum!

Store in refrigerator
These cookies don’t have much that keep it bound together. If you let the cookies sit out in a container on the counter you will end up with a massive cookie mountain. All your cookies will stick together and it’s almost impossible to get them apart and keep the cookie in one piece. If you stick them in the refrigerator they will last longer and keep their shape. I usually pop one in the microwave for about 15 seconds to take the chill off before eating it.  

I hope you like these cookies just as much as I do! Leave me a comment down below if you try them. Happy eating!


print recipe


Oatmeal Chocolate Chip Cookies
Refined sugar and flour free! Still has the same delicious taste!
Ingredients
  • 1 cup oats
  • 3/4 cup ground oats
  • 1 1/2 tsps baking powder
  • 1 1/2 tsps cinnamon
  • 1/2 tsp salt
  • 2 tbsps coconut oil (melted and cooled)
  • 1 tsp vanilla
  • 1 egg
  • 1/2 cup honey
  • 1/2 cup chocolate chips
Instructions
1. Preheat oven to 325 degrees. 2. Heat coconut oil in microwave (30-45 seconds) and set aside. Combine egg, honey, and vanilla. When oil is cool at to the mixture. 3. In another bowl combine all the dry ingredients. 4. Slowly add the dry mixture into your wet mixture. Stir until well combined. Fold in chocolate chips.5. Cover bowl with saran wrap and refrigerate for at least one hour. 6. Prepare a pan with parchment paper and use a cookie scoop to place dough on sheet. The cookies wont expand much so about 2 inches apart is sufficient. 7. Bake for 13-15 minutes. Let cookies completely cool before placing them in an airtight container.
Details
Prep time: Cook time: Total time: Yield: 12 cookies

Monday, August 28, 2017

Fall Lipstick

Fall is sneaking up on us more quickly than I thought it would. It seems like every store has fall decor and flavors. I have been obsessing over the pumpkin iced coffee from Dunkin - so good!! Now I just need Starbucks to come out with their pumpkin spice (insert praising hands emoji). With Fall coming, it only seems natural to share some lip colors that will take you into Fall. I picked out four shades that I personally love and that I think will go perfectly with chunky sweaters, blanket scarves, and of course the ever so popular riding boot.
In order of descriptions below
Maybelline Nude Embrace
I love love LOVE this color!! This lipstick has a matte finish and glides on so smooth. It is called a nude but it looks a little more brown than nude on my skin tone. This is the perfect shade to transition into Fall with because it can be worn now with your favorite tank dress and in the Fall with a chunky sweater and jeans. The color is long lasting and price point is too good to pass up!

Revlon Plum Baby
This is a great color and this Revlon line in general is great for any woman. The colors are more transparent but also give color. Think tinted lip balm but without the thick chapstick feel. This goes on very creamy and again with the price, it is hard to pass up. This color is a definite fall staple and adds a pop of subtle dark color to match your cooler weather wardrobe.

Model Co Smitten
I love a good red, especially in the cooler months. Not everyone is brave enough to pull off a red but if you are, I highly suggest this one. Red is bold and it is an attention grabber, but I say go for it! While this isn't the exact shade I have it is comparable. I really like this lipstick because it is longwearing. I wore it all day and did not have to reapply, that is unheard of! ModelCo also has a longwearing lipstick that I think I will order in the shade truffle! If their regular lipstick lasts all day, I can’t wait to see how long this one lasts!

NYX Butter Lipstick Moonlight Night
This butter lipstick has become my new obsession. It is OMG good. If you don’t like the feel of lipstick this IS the lipstick for you. This literally feels like butter on your lips, it is that smooth and creamy. I already have three shades and recommend it to anyone who asks about a color. It comes in 35 different colors so there has to be one that fits what you’re looking for! This shade is very dark but is perfect for a Fall date night look. I just saw they have a matte version too which I may try because I have a 25% off coupon burning a hole in my pocket! Anyone else feel like they need to immediately go and buy something when they get a coupon?

Although I link most drugstore products through Ulta, they can always be found at CVS, Target, and Walmart. I actually prefer to go to CVS because I always have coupons to use there, and the more you buy the more coupons they give. I think that’s how they get me to keep coming back! What are your favorite colors for Fall?

Friday, August 25, 2017

Baked Lemon Chicken

I had a three night slumber party with my sister this week, hence the no new blog posts. I love spending longer periods of time with her because I don’t get to do it too frequently. We had so much fun and while it was so nice having her, it feels good to be back to my routine. Keeping an 8 year old entertained is a lot of work and very tiring; hats off to all you working mamas out there! It definitely gave me a glimpse of what it'll be like to have my own kids...someday! My sister, like my husband, is a very picky eater. If I blogged about what we ate you’d be pretty bored. We ate chicken, chicken, and more chicken. Oh, and mashed potatoes. Lucky for you, last week I made this delicious chicken recipe. It is packed with lemon and perfect for summer because of the light and fresh flavors.


Jay loves chicken. We have it almost every night so I am constantly looking for new ways to cook it up. I like using lemon because it tends to keep the chicken more moist while adding flavor. I’ve made this chicken twice already so I thought I would share some tips for cooking.


Marinate a few hours
While this is not required, I did notice that the chicken soaks up a lot more of the flavors. The first time I made them I just dipped the chicken in the lemon-egg mixture. The chicken came out delicious, however, the second time I made them I let it marinade all day in the mixture and the flavors came through a lot more.


Pound it flat
This step is not necessary but the chicken will cook more quickly and add a bit more of a crunch. I simply lay saran wrap over the chicken and flatten it with a meat tenderizer.


Use almond flour instead of breadcrumbs
Breadcrumbs make the chicken crispy and crunchy, but they are not the best when you’re trying to cut back on carbs. Try using almond flour as the breading versus the breadcrumbs. You will still get the crispy breaded texture it just won't be as crunchy.


Skip the cheese
I based this recipe off of a baked chicken parmesan recipe. If you skip the cheese I promise you you will not miss it. By using the lemon, you’re not missing any flavor and you cut back on some calories- woot!


Choosing the sides
The first time I made this chicken I had sweet potato and my greek salad for a side. The second time I made this chicken my sides were cheese tortellini, salad, green beans, and corn on the cob. One night we had company and the other we did not. Can you guess which time was which? This chicken can be paired with so many sides, it’s so versatile!


I hope you enjoy this baked lemon chicken recipe. What are your favorite ways to make chicken? Happy eating!


print recipe

Baked Lemon Chicken
Ingredients
  • 1 pound chicken breast
  • 1 egg
  • 2 tbsps (juice of half) lemon
  • 1 tsp dried parsley
  • 1/2 tsp salt
  • 1/2 tsp pepper
  • 1/2-1 cup almond flour
  • 2 tsps minced garlic
Instructions
1. Whisk together egg, parsley, garlic, lemon juice, salt, and pepper. Set aside.2. Flatten chicken (optional) then add to egg mixture. Refrigerate for a few hours (also optional).3. Dunk chicken in egg mixture than dip into almond flour. Make sure it is fully coated in the almond flour. 4. Lay on a greased pan and cook for 30-40 minutes in a 375 degree oven.
Details
Prep time: Cook time: Total time: Yield: 4 servings

Tuesday, August 22, 2017

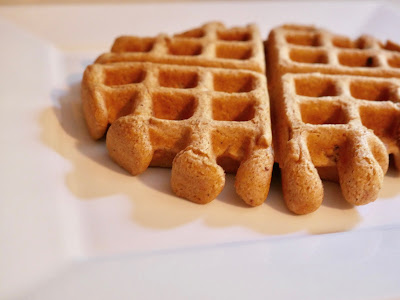
Whole Grain Waffles

On the weekends, my husband and I like to enjoy a big breakfast together. We’ve been doing this since we have lived together and it’s a great way to start our day. I try to make pancakes or waffles once a week so I like to ensure that they are made in the most figure friendly way. I found the recipe for these waffles here and it was already low in sugar and carbs. I did make some small tweaks and I love how they came out!

If I am being honest I gave up on making waffles that fit my whole30 diet. I decided that I just wouldn't be able to eat them that way because I’ve tried using coconut flour and almond flour and then no flour and they were so bad. One burned as soon as it hit the waffle iron, can you guess which ones they were? Hint: they had no flour! The ones I made with coconut and almond flour had the worst mealy texture - yuck! So if you have any tried and true whole30 waffles, let your girl know.
For these waffles I just wanted to make a relatively sugar free recipe with basic components that would actually taste good. I was initially attracted to this recipe because of the cinnamon and nutmeg components. I’m totally getting into the fall mode and this fit the bill! I made the swap for whole grain flour because I wanted these waffles to be hearty and filling. I also cut the oil in half and used unsweetened applesauce to compensate for the oil loss. I would’ve completely swapped out the oil for applesauce but when I have done this in the past with waffles, they don’t get crispy enough. I felt confident that this was going to be a winning recipe! I was nervous while making these because the batter was so thick, but don’t let that put you off. Once they were cooked they came out with the most beautiful outer crunch and the softest insides. I think that’s what everyone is looking for in a waffle, am I right?
One of my biggest pet peeves is eating cold food. Cooking everything to be ready at the same time is not easy and requires some skill. I have pretty much mastered when to cook the eggs while the pancakes are cooking, or how long to wait before I put the breakfast potatoes in the oven. But what’s really tricky is using a waffle iron that only makes one waffle at a time. By the time you’re done with the last waffle, your first one has already been done for about 15 minutes which means it is cold as ice! I’ve tried keeping them under a plate, sticking them in the microwave, and wrapping them with foil. All of these are great tricks but they don’t keep the waffles warm and crispy. I find the waffles begin to fall limp and soggy - ew! Gwen, from Delightful Adventures had an amazing trick. As the waffles come out of the iron, put them on a wire wrack on a pan and place them in a 200 degree oven. Genius! This trick actually worked. Do you know how much joy that gave me? Probably an embarrassing amount but I do not care! Thank you so much for the tip, Gwen! I loved sitting down at the table and getting to eat hot waffles with my husband. Speaking of husband,  I absolutely hate when everything is ready and Jay is not. He learned very quickly that when I say breakfast is ready, he better get his booty to the table ASAP or he has to deal with my wrath (love you, babe).

Try this recipe. It is Jay approved, which if you’ve been following me for a while you know that he is the pickiest eater. Let me know what you think! Happy eating!


print recipe

Whole Grain Waffles
Hearty waffles that will keep you full all morning!
Ingredients
  • 1 1/2 cups coconut milk
  • 1 tbsp maple syrup
  • 2 tbps coconut oil (melted and cooled)
  • 2 tbsp unsweetened applesauce
  • 1 tbsp baking powder
  • 1/2 tsp baking soda
  • 1 tsp cinnamon
  • 1/2 tsp nutmeg
  • 1/4 tsp salt
  • 2 tsps vanilla extract
  • 2 cups whole wheat flour
Instructions
1. Melt coconut oil and set aside to cool.2. Combine milk, maple syrup, vanilla, and applesauce. 3. Slowly whisk in flour, baking soda, baking powder, cinnamon, nutmeg, and salt. 4. Add coconut oil. If batter is too dry add milk, 1 tablespoon at a time until it is at a desired consistency. The batter will be thick. 5. Heat a waffle iron and add about two big scoops of the batter to the iron. 6. Serve hot with maple syrup!
Details
Prep time: Cook time: Total time: Yield: 4 waffles
*recipe adapted from Delightful Adventures

Monday, August 21, 2017

Stitch Fix Review + Video!

My best friend, Leah, is a stylist for Stitch Fix. Even before she was a stylist there I had heard good things about this company. Once Leah started working for the company, I was reassured that I needed to sign up for a fix. So that is just what I did. I requested Leah to be my stylist for two reasons. One she knows me and my style and two she has excellent taste. She could be wearing workout wear and still look pulled together. I knew she would pick out pieces that would flatter my body and send me pieces that I normally wouldn't pick out myself.

Pre-Fix
Before you get your fix you will take a survey about your personal style. Things you like to show off, things you like to hide, colors you like and colors you don't like, etc. You’ll also see examples of outfits and rate them on a scale of how much you like them. You tell your stylist how often you want to see tops, bottoms, dresses, jewelry, and shoes in your fix. You also include the work you do and can specify any special events that you might have coming up. There are also places where you can leave a note for your stylist, or request a stylist as I did. You get to chose how often you want a fix but that can be changed at anytime.

The Fix
Merilyn Shirt Dress by 41Hawthorn $68
I’m wearing a size medium and guys I feel like this dress was made for me. It hits my waist perfectly, is a great length for teaching and it is so light. This will be a great dress to wear when the weather begins to get a bit cooler. I would pair this dress with a strappy heeled sandal like these or black tights and booties. 

Cameron Bow-Back knit top by Pixley $54
I love this sweater. The bow detail in the back is my favorite part. I have always loved polka dots so this sweater was a definite win! I’m wearing a size small. I noticed that the tops do tend to run big and I am SO glad my stylist sized down for this sweater. I paired this sweater with my new favorite jeans. I have them in two colors and they are seriously amazing.


Jarred Lace Detail Cap-Sleeve Blouse by Brixon Ivy $58
I absolutely adore the lace sleeves on this shirt. It’s such a feminine touch and dresses up the blouse. I’m wearing a size medium but I am exchanging it for a small. I love that Stitch Fix gives you the option to exchange a shirt. I paired this shirt with one my favorite Loft skirts. I have so many of them because they fit great and the length is perfect. 
Abrianna Longsleeve Knit Cardigan by 41Hawthorn $38
Cardigans are perfect for Fall and can get you through the cold Winter months. This cardigan is super soft and the color is gorgeous. I like how it is a bit longer so you could wear it with leggings on the weekends. I’m wearing a size medium. I paired te cardigan with this tank from Target and Gap jeans.


Nopa Halter Blouse by Skies are Blue $48
As soon as I opened my box, my eyes were drawn to this blouse. I love the colors and the cut is so different than what I already have in my wardrobe. I’m wearing a size small and it fits perfect. I think I may wear it this weekend with some ripped denim shorts and a flat sandal.

How it works
You try on all the things you got sent and decide what you want to keep, exchange, or send back. If you keep all five items, you get an additional 25% off your order, which is fantastic! Included in the box is an envelope with postage already on it for anything you need to send back. Simply do it within three business days of getting your fix to ensure that you don’t get charged for it. Also included is a card with how to style each piece. I love this because it gives you fresh ideas on how to style your new pieces.

Feedback
This step is really important because this is how you will let your stylist know what you’d like to see next time, how the clothing fit, what you liked, and what you didn’t like. I made sure to tell Leah what I liked about each item and gave her some items I might be looking to receive next time. This will ensure that you’re getting the best fix for you.

The Verdict
Overall I am super happy I signed up with Stitch Fix and I am really pumped to get my next fix...in three months. LOL. You can pick how frequently or infrequently you want to get a fix. I really wanted to get a fix because I know Stitch Fix has its own unique brands. This really attracted me because I like to wear things that are different. I still like to go shopping on my own so I didn’t want to receive a fix too often. Leah gets her fix every 3 weeks whereas I opted to get mine every 3 months. I know that I will like everything Leah sends me and I would end up keeping everything. The items are a little more expensive than what I would typically spend but they are also of a much better quality. As I am getting older I want to invest in higher quality pieces that will last rather than pieces that are cheap and not made well.

If you’re thinking about trying Stitch Fix I highly suggest you do it. If you don’t like anything you can return all the pieces, really what is there to lose? Here’s a referral link and in your notes ask for Leah Banks to be your stylist! Stay beautiful!

Friday, August 18, 2017

Pumpkin Chocolate Chip Cookies


It’s almost that time of the year again. The Fall decor is starting to pop up at Homegoods, Marshalls, Michael’s and Hobby Lobby; just to name a few! While I LOVE all the fall decor I love something even more. But what’s even better than fall decor you might ask? Fall flavors. The cinnamon, nutmeg, pumpkin, oh the pumpkin!! I am so excited about the pumpkin! Yesterday I went out with one of my best girlfriends and we were happily surprised to learn that Dunkin has their pumpkin spice flavor back. Drop everything now and go to your nearest Dunkin to get yourself a pumpkin spice coffee. I can’t explain it but when you drink it you just feel happy.

With Fall right around the corner I thought it was the perfect time to start testing out some pumpkin flavored recipes. Today I am sharing a pumpkin chocolate chip cookie recipe. I wanted to take the original recipe, which I am obsessed with, and make it a little more figure friendly. I had high expectations for these cookies because the original recipe is so addictive and full of flavor that you literally cannot just eat one of them. You can find the original recipe here. I started brainstorming how I was going to replace certain elements of the recipe but still keep the integrity of the cookie. There were three ingredients that I knew had to go; white flour, sugar, and canola oil. There were a few different options I wanted to try, but I picked the ones that I knew would work well for these cookies.

The Flour
White flour is like dating someone who is all wrong for you. You feel great when you’re with them but then later on you feel really bad about yourself. White flour is just like this. It gives you bread, pasta, muffins, cookies, did I mention bread? So yes, it is hard to break up with white flour. But what if I told you I have a good replacement. Something that will leave you happy in the moment and won't leave you feeling bad about yourself about an hour after you eat. What is this magical flour?! Cue coconut flour. Coconut flour isn’t something you can just use without doing some research on it, lucky for you I’ve already done the legwork. I talked a little bit about coconut flour in this post but I’ll tell you how I used it differently for these cookies. The ratio for white flour and coconut flour is not 1:1, it’s more like ¼:1. When I used this ratio for my zucchini brownies I noticed that the they were very moist and while that is great for a brownie or cake, I didn't want that for a cookie. I decided to use ½ cup of coconut flour and an additional egg to help bind the cookies. I am so happy I decided to do this because the cookies are firm but not dry.

The Sugar
Sugar is similar to white flour. The only difference is, you don’t know you should break up with sugar while you’re eating it. You're happy and giddy, and even crave the sugar if you’ve been without it for a while. But then something happens. You realize that if you resist the cravings, even for just one week you realize that you don’t need sugar to make you happy. You can live a relatively sugar free life and still enjoy the food you eat! There are some healthier alternatives, and I promise you they are just as good! For this recipe I wanted to use honey but similar to coconut flour it is not a 1:1 ratio to sugar. I used ½ cup honey to replace the 1 cup of sugar. I did this because honey is much sweeter than sugar so you need less and it contains some traces of nutrients and vitamins. I read this great article on honey vs. sugar and I found it very interesting. Basically honey is higher in calories than sugar but sugar can cause weight gain and is much harder to digest than honey. So both have their pros and cons but personally, I’d rather use honey.

The Oil
This recipe called for canola oil. While canola oil has a lot of health benefits already, I am partial to coconut oil. I find that this oil is great to bake with and it too has lots of health benefits which you can read about here. Basically it can help with digestion, killing harmful microorganisms that can cause infections and can reduce hunger. I replaced the canola oil with ¼ cup of coconut oil and added an additional ¼ cup of unsweetened applesauce.

The Results
I had high expectations for these cookies and they didn't disappoint. These cookies are so good but I always like my recipes so I feel like I am biased. I gave these cookies to about five different people and they all agreed that these cookies are delicious! They’re soft but they don’t crumble when you pick them up. They’re sweet and satisfying without ruining your diet. Who doesn’t want a cookie like this?!

Let me know if you try them. I’d love to hear from you! Happy Eating! 


print recipe


Pumpkin Chocolate Chip Cookies
Healthier version of a delicious favorite
Ingredients
  • 3/4 cup pumpkin
  • 2 eggs
  • 1/2 cup honey
  • 1 tsp vanilla
  • 1/4 cup unsweetened applesauce
  • 1 tsp coconut milk
  • 1/4 cup coconut oil (melted and cooled)
  • 2 tsps baking powder
  • 1 tsp baking soda
  • 2 tsps cinnamon
  • 1/2 cup coconut flour
  • 1/2 tsp salt
  • 1 cup chocolate chips
Instructions
1. Preheat oven to 325 degrees. 2. Combine all wet ingredients. Add the dry ingredients and whisk together until well incorporated.3. Fold in chocolate chips.4. Using a cookie scoop (or small ice cream scoop) place onto a greased pan (or use parchment paper). Do not squish them flat because that is the shape they will hold. 4. Bake for 20-25 minutes or until the cookies are firm to the touch.5. Let cool, than enjoy!
Details
Prep time: Cook time: Total time: Yield: 2 dozen

Wednesday, August 16, 2017

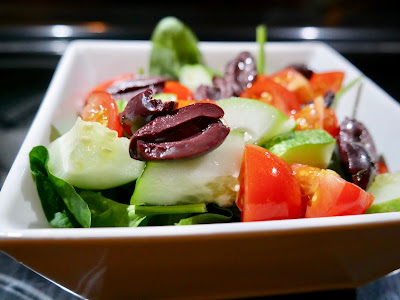
Greek Salad

I have been living off of this Greek Salad. Since I’m doing the whole30 right now I need a lunch that is both nutritious and tasty. It is easy to find healthy foods, but healthy foods that taste good is a whole other battle. I’ve found this greek salad to be a great staple and you can pair it with a lot of different proteins. Sometimes I’ll use leftover chicken from the night before or hard boiled eggs. I’ve been wanting to try it with tuna salad but haven't gotten around to making my whole30 mayo.

This salad is perfect for summer because it is light and fresh. I love using spinach as my base and adding fresh cucumbers and tomatoes. I have been obsessing over Kalamata olives ever since I first tried them a few weeks ago. I like to get them from the deli so they are marinated in all kinds of goodness!

Dressings can turn a salad from healthy to unhealthy real fast. Lots of bottled dressings are high in fat and sodium. By creating your own, you control what goes into it. I like to use a little bit of balsamic vinegar, olive oil, and salt. Since I am using marinated olives and tomatoes, I find that I don’t need much dressing because those two ingredients provide flavor.

Life has been busy over here. As I have shared before, we took down the wall between our kitchen and dining room and finally, FINALLY the beam is going up on Saturday and the studs will be gone! I am beyond excited and yes, I will be doing a post about that and our new dining room table! We, and by we I mean my husband and my uncle, have been working on this table for over a month. I cannot wait to show you guys! Let me know if you would like to see more of the process of building the table, just the product and how to style it, or both! I’d love to hear from you!


print recipe

Greek Salad
A light salad full of flavor!
Ingredients
  • handful baby spinach
  • 1 small diced cucumber
  • 5-6 grape tomatoes, halved
  • 5-6 kalamata olives, sliced
  • 1/4 cup favorite protein
  • balsamic vinegar
  • olive oil
  • sea salt, to taste
Instructions
1. Prepare cucumber, tomatoes, and kalamata olives. 2. Top baby spinach with prepared vegetables. 3. Drizzle with olive oil, balsamic vinegar, and sea salt. 4. Add your protein (optional) and enjoy!
Details
Total time: Yield: 1 Salad