Tuesday, August 8, 2017

Luscious Locks - Haircare Routine

I didn’t start coloring my hair until last year. I was always afraid to put any color in it because I loved how dark and naturally highlighted it was. When the balayage trend started to become really popular I knew I wanted to try it. It wasn’t too much of a change and if I hated it, I knew it would grow out. And guess what? I did hate it! LOL. I ended up with more of an ombre than a balayage. So my first experience with hair color was not the best. But from that I learned two things. One: find a hairdresser whose work you’ve seen before and that others recommend and two: bring lots of pictures to your hair appointment.
Luckily I found an amazing stylist, Taylor. I’ll link her instagram here so you can see her fantastic work. She is awesome at color and seriously listens to exactly what you want. I showed her some pictures and she did just what I wanted, she blew my expectations. I’ve been going to her for about a year and she’s colored my hair three times. This time she suggested a do a foil highlight and since I totally trust her color judgement I went with it. I am SO glad we did because my hair looks amazing! Taylor is an absolute sweetie and so easy to talk to, I feel that’s important in a stylist. If you need a new stylist and you live in CT she is the girl to go to!

I used to use Pantene and Suave. After using Pantene for a while I noticed that when my hair dried it was left feeling greasy or oily by the root. My Aunt recommended I try this Suave shampoo because she had experienced something similar. It gets your hair feeling really clean however, it didn’t leave my hair silky smooth. I was talking to my hairdresser about it and another stylist started to tell me about all the chemicals that are in drugstore shampoos which could be the cause of the grease or oil that was left behind. Taylor recommended that I try Paul Mitchell forever blonde shampoo and conditioner. It’s not only good for color treated hair but it smells amazing too! It leaves my hair feeling clean, smooth, and smelling fantastic!

I only wash my hair about twice a week. In between washes I’ll use this Living Proof dry shampoo. I’ve tried a few kinds but this one really leaves my hair feeling clean, like I actually washed it. It smells really good and doesn’t leave a residue on my dark roots. I first got this as a sample and then I just recently bought a bottle when I went to Ulta the other day. It is definitely worth the price.

One of the beauty blogs I follow Bring Your Own Beauty turned me onto this Ouai oil. I have pretty bad fly-aways and as the summer progresses they seem to be getting worse. I like this oil because it can be used on wet or dry hair. I use about two pumps when my hair is wet and run it from my roots to my ends. This stuff smells so good! It has a rose water scent but it is very light. When I use it after I style my dry hair, I use about ½ pump and run it through my ends and lightly at my part. It really helps to keep the fly-aways down and gives a nice shine. 
 
What are your favorite hair products? I’d love to hear from you! Stay beautiful!

Monday, August 7, 2017

Zucchini Brownies - Gluten Free!

I love baking with vegetables for a few reasons. One you can’t taste the vegetable in the baked good so it is a great way to sneak it in for picky eaters *cough my husband cough*. Two it adds SO much moisture to whatever you’re cooking that it makes the baked good even more delectable. Three it’s a great way to use up leftover veggies at the end of the week or if you just happen to have a plethora of veggies hanging around.


I was lucky enough last week to be able to pick from my friend’s garden. She was leaving for vacation and entrusted me with the most gorgeous garden I have ever seen. There are rows and rows or basil, tomatoes, peppers, and so many pickle and cucumber plants, I felt truly blessed to be able to call this garden all mine for a week. Before she left she gave me the biggest zucchini, it was probably the size of a small child’s leg. I am not even exaggerating. I knew I wouldn’t be able to eat it all by myself because Mr. Picky (aka my husband) doesn’t love zucchini so I knew I would be sneaking it into his favorite things.
From this one zucchini I made three different baked goods and pancakes (more to follow on the blog soon!). Today I am sharing these moist and rich chocolate brownies. I found the original recipe here but I needed to make it gluten free because I was bringing it as a dessert to a friend who is gluten free. I was puzzled on how to make these gluten free so I did some research on replacing flour with coconut flour. This can be tricky because coconut flour absorbs liquid much more than regular flour does. I knew if I used too much than the brownies would be very dry and crumbly. Trust me, I know from prior experience - oops!
I found that when replacing flour with coconut flour the ratio is not 1:1. In fact the ratio is 1:⅓ plus the recipe needs an additional form of liquid. My options were to use another egg, add applesauce, or use milk. Can you guess the one I picked? Coconut milk, obviously! If you’re new here, first of all welcome, and second get used to the fact that I use coconut milk A LOT. I’ve found that the flavor doesn’t come through in the baked goods so it is a great dupe for regular milk. That being said, the batter was very liquidy but I knew that the coconut flour would soak most of that up while cooking, trust me it will! These brownies are very moist so if you don’t like a moist brownie I would suggest adding 2 tablespoons to ¼ cup more of the coconut flour. 

These were a hit with my friend who is gluten free. She even texted me the next day to say her kids were mopping them up for breakfast! If they’re kid approved then they must be delicious right? Enjoy these scrumptious brownies! Happy eating!


print recipe


Zucchini Brownies
A moist healthy brownie that will curb your craving for a decadent chocolate dessert.
Ingredients
  • 2 eggs
  • 1 tbsp vanilla extract
  • 3/4 cup coconut sugar
  • 1/4 cup unsweetened applesauce
  • 1/2 cup dark chocolate cacao powder
  • 1 1/2 tsps baking soda
  • 1/4 tsp salt
  • 2 cups grated zucchini
  • 1 cup semi sweet chocolate chips
  • 1/3 cup coconut flour
  • 1/3 cup coconut milk
Instructions
1. Peel and grate about 2 medium zucchinis. Set aside.2. Combine all dry ingredients in a medium bowl. In another bowl whisk together milk, eggs, vanilla, applesauce, and zucchini. 3. Add the dry ingredients to the zucchini mixture and stir until well combined. Fold in the chocolate chips. 4. Line a 8x8 baking pan with parchment paper (or coat with nonstick spray) and pour batter in. Sprinkle chocolate chips on top. 5. Bake in oven at 350 degrees for about 30-35 minutes or until a toothpick inserted in the middle comes out clean.6. Let cool completely, then enjoy!
Details
Prep time: Cook time: Total time: Yield: 9-12 brownies

Friday, August 4, 2017

Whole30 Chicken Stir Fry

I am so happy it’s Friday, and what’s even better is that summer school is over and I have three weeks to relax before I go back to school. Three weeks may seem like a long time but I know it is going to fly by! I’m trying to get in as much cooking as I can because I know when the school year starts I will want to fall back onto some of these recipes. Yesterday I was baking up a storm and I cannot wait to share the delicious baked goods I made! Coming soon…
Today I am sharing a whole30 chicken stir fry. This stir fry is unique because it does not use soy sauce. Typically when I make a stir fry, soy sauce is one of the main ingredients. My husband isn’t the biggest fan, so I wasn’t disappointed when this recipe left it out. My whole30 book has been my go-to lately, as I have shared before. Have you snagged it yet??
What makes this recipe so likeable is that you can pair it with many different dishes. It could be served on a bed of baby spinach, over rice, or simply by itself. I would love to try it with lo mein noodles but I will try that when my whole30 diet is over in 25 days, not that I am counting or anything. 

Having flavorful recipes like this don’t make me miss the foods that I used to eat and honestly I am feeling 100 times better already. I have already dropped 4 pounds and my stomach feels so much happier. I am a little low on energy and yesterday I was SO cranky (and my husband got the wrath of it) but I know by next week I will feel great! I can’t recommend this dietary change enough!
Here are some tips when making this stir fry:
  1. Cut your chicken small before cooking. If you’re an impatient cook or just need dinner ready quickly, this is a key step to this recipe. The chicken will cook so much faster!
  2. Prepare your vegetables prior to cooking. I’ve said before that I do food prep on Sundays. It will save you so much time during the week if you wash and cut all your fruits and vegetables ahead of time. This way you can just dump the vegetables directly from the container into the pan!
  3. Use a large skillet. This may seem obvious but it may not be to all. It really helps if you use a pan with higher sides because there is a lot to mix around. If you don’t you’ll end up with food all over your burner!


I hope you enjoy this meal. Let me know if you try it and what are some of your favorite healthy recipes. Happy eating!


print recipe


Whole30 Chicken Stir Fry
A healthy stir fry that can be paired with any dish!
Ingredients
  • 3 tbsps coconut oil
  • 1 pound chicken breast
  • 1 tsp (1 clove) minced garlic
  • 1 tbsp ginger
  • 1 head broccoli florets
  • 2 carrots
  • 1/2 pound green beans cut into small pieces
  • 2 green onions
  • 1/2 lime juiced
  • 1 tbsp cilantro, finely chopped
Instructions
1. Heat 2 tablespoons of coconut oil in a large skillet. Cook the chicken on medium heat until cooked through. Add the garlic and ginger and cook until fragrant. Remove the chicken from the pan and set aside. 2. Heat the remaining coconut oil and add the broccoli, and green beans. Stir fry until tender. 3. Add the chicken and mix everything together. Cook for about 3 minutes until everything is combined. 4. Top with green onions, lime juice, and cilantro. Serve with salad or rice.
Details
Prep time: Cook time: Total time: Yield: 4 servings

Recipe from The Whole30: The 30-Day Guide to Total Health and Food Freedom 

Wednesday, August 2, 2017

Whole30 Chili

I decided to do the Whole30 to finish out the summer feeling happy and healthy. I made this decision because I was feeling like my energy was really low and I was craving unhealthy foods constantly. I love the Whole30 because you cleanse your body of all processed foods and just eat clean.


I am on day 3 and I feel good. The first day I was doing great and feeling awesome until about 2 o’clock. I suddenly had the biggest craving for anything and everything unhealthy. Here are a few snacks that crossed my mind: a McDonalds hash brown, Starbucks pumpkin loaf (my weakness), oreos, cheese, or a buttery croissant. As you can see, all super processed and full of things I am trying to cleanse my body of. I seriously contemplated getting in my car and driving to Starbucks to give into my craving, however I did not. I am tired of saying “Oh I’ll start tomorrow.” So here we are. Day 3.
The best advice I can give to you if you’re trying the Whole30 for the first time is, be prepared. Create a grocery list, plan out your meals and snacks, and tell everybody you’re doing it. I find this holds me much more accountable because people will often ask how it's going. When it comes to planning food I mainly use Pinterest and my Whole30 cookbook. Here is what’s on the menu for this week. I will probably do a few more posts on the Whole30 as I continue throughout the month but today, we're talking chili!

I have to tell you that I’ve made a healthy chili before and it came out horrible. The broth was thin, the flavor was lacking, and all around the chili was not hearty and comforting like you’d want it to be. But this Whole30 chili is everything! It is thick, absolutely delicious, and is packed with so many rich vegetables. I made this recipe for my aunt and uncle last week and my uncle loves chili but the regular kind of homemade chili. You know the kind with all the fixings and loaded with cheese, sour cream, and beans. I was more than nervous that he wouldn’t like my recipe and had BigY’s number on speed dial ready to order a pizza when my meal was booed out of the kitchen; but boy was I wrong. My recipe was not booed, I did not see a contorted face upon their first bite, and no one, I mean no one left that table with an empty stomach. Guys, I am not joking when I tell you to double, maybe even triple this recipe if you are making it for more than four. It is so good and everyone will want seconds. My husband and my uncle were so stuffed but were literally licking their bowls because the chili was just that good! Run, I repeat RUN to the grocery store to get these ingredients and make this chili for dinner tonight!


I will be posting lots of recipes this month that eliminate refined sugar, grains, dairy, and legumes. Please let me know if there is anything you’d like me to try, I love altering recipes to make them healthier. Happy eating!


print recipe

Whole30 Chili
Tasty chili made with fresh vegetables and guilt free!
Ingredients
  • 1 pound ground meat
  • 1 finely chopped onion
  • 3 tsps (or 3 cloves) minced garlic
  • 1 tsp cumin
  • 1/4 tsp (recipe called for 1 tsp but I do not like heat) chili powder
  • 1/2 tsp paprika
  • 1/2 tsp mustard powder
  • 1/2 tsp salt
  • 1 finely chopped green bell pepper
  • 1 finely chopped orange bell pepper
  • 1 can (14.5 oz) diced tomatoes
  • 2 cups beef broth
Instructions
1. Heat a large pot on medium heat and add ground beef. Cook until meat is browned and cooked through. Remove from pot but leave the juices. 2. Add the onions, garlic, cumin, chili powder, paprika, mustard powder, and salt to the pot. Cook until the onions become translucent. 3. Add the pepper, tomatoes, broth, and meat to the pot. Bring to boil and then reduce to simmer. 4. Simmer uncovered for 1 hour, stirring occasionally.
Details
Prep time: Cook time: Total time: Yield: 4 servings

Recipe from The Whole30: The 30-Day Guide to Total Health and Food Freedom 

Tuesday, August 1, 2017

Sephora and Drugstore First Impressions + Video!

This weekend I did a little makeup shopping and I thought I would share some of my first impressions while trying out my new products. I love trying new things but I know how scary it can seem. You don’t want to waste your money on products that you may not love. I picked out a few different makeup items and focused on how they look, feel, and apply on the skin. I hope this helps as you shop for makeup! Stay beautiful!


The Products
Bobbi Brown Instant Full Coverage concealer in shade Sand
Becca Mineral Blush in shade Nightingale
Maybelline Master Strobing Stick in shade Medium
Maybelline 24K Nudes eyeshadow palette
L'Oreal Voluminous Lash Paradise in shade Blackest Black
L'Oreal Colour Riche lipstick in shade Tickled Pink

All opinions are my own.

Monday, July 31, 2017

Makeup Storage

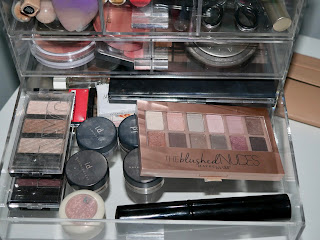
I’ve stored my makeup so many different ways. When I was living at my parents house I stored it on my desk shelves in a small makeup bag. I would literally have to dump the thing out every morning and put it all away when I was done - how inconvenient. From there I upgraded to a small jewelry organizer. You know those things that had about three sections and were all the rage at Marshalls? I actually still have one, but I use it for a much different purpose. When I moved out of my parents house and into our first apartment I was lucky enough to get a makeup desk. This is from ikea and I really love it! I used the drawers to hold my makeup and these clear organizers to keep everything in its place. That worked for a while, but as my makeup collection continued to grow I started to outgrow the organizers.

I have always loved the acrylic makeup organizers and finally got my hands on this one. My husband got it for me for my birthday and I instantly fell in love with it. All of my makeup fit perfectly in it and it has been much easier to access it as I get ready. I cleaned out all my makeup before putting it away in it’s new beautiful home and gave all the things I didn’t want/need anymore to my little sister. She was SO excited and has been wearing it every time I go visit her, she’s too cute!

I bought this lipstick organizer from Marshalls and have linked a similar one here. Before I stored my lipsticks in one of those clear organizers in my desk and I could never find what I was looking for. I had to dig around and usually ended up picking whatever was on top to use. Now I am able to see what options I have and if my collection continues to grow, which let's be honest will happen, I would definitely purchase another one and keep it on my desk.


How I organize my makeup


The bottom drawer is the deepest so I store all of my primer, foundation, and setting products there. Lots of times powder packages can be much larger so this is a great spot for them. I also store my beauty blender there so it does not get squished.  


The next drawer is where I store all my shadows and shadow palettes. I will be honest, I have a lot of shadows and I do not utilize them enough. As a teacher, I feel a little self conscious if I wear my eye makeup a little darker but this year I am not going to let that stop me. I am not going to go all on dark smokey eye but I want to play more with colors!


I love the next drawer because it is split into two sections. On the right side I keep my bronzers and highlighters. I’m in the market for a new bronzer, if you know of any please let me know! I’ve heard great things about this one. On the left side I keep my beloved blushes. I LOVE blush. I have a new one coming in the mail this week that I am really excited about. It has amazing reviews and the best part is that I purchased it on Amazon - score!
 The last drawer is split into three sections, which ended up working out so perfectly. I am telling you, this acrylic box was made with me in mind! In one part I keep all of my concealers. I feel like I am constantly buying new concealers because there are a lot out there. This one and this one are my two favorites but both for different reasons. The It Cosmetics one is very thick and has great coverage whereas the Maybelline instant age rewind is very light and typically doesn't crease on the undereye. In another section I store all my mascaras which are probably my second favorite beauty product. 
  The top of the acrylic box lifts up to reveal six small storage sections. This is where I keep all of my sample products. I used to subscribe to Birchbox, which I loved and I am not sure why I didn’t resubscribe. Every month you get about 5-6 beauty samples for only $10! I found some of my favorite beauty and hair products this way.  

That’s how I store my makeup! I am thinking about getting another acrylic box to store all my jewelry in. Right now it is in a beautiful wooden jewelry box but it doesn’t fit in with my style anymore. Do you have any favorite ways to store makeup or jewelry? Stay beautiful! 


Friday, July 28, 2017

Juicy Garlic Burger with Sweet Potato Buns

Summer means lots of cookouts which could lead to an overload of greasy foods wrapped in carbs. I typically don’t eat frozen burgers because I just don’t love the taste of them. But I do love homemade burgers, especially when my husband grills them on the grill - as if that wasn’t obvious, where else would you grill?! If you love getting together with friends and family but hate the way you feel after you gorge yourself full of unhealthy (but usually oh so tasty) food, then this recipe is for you!
I make my burgers using ground beef, worcestershire sauce, garlic powder, salt, and pepper. That’s it. They are SO delicious. The flavors of the garlic and worcestershire sauce go perfectly together. I like to top my burger with an over-easy egg which will shock my father. As a kid, I hated cooked egg yolks. The chalky texture and yellow color really freaked me out. As an adult I still hate cooked egg yolks, I even throw them out when I make hard-boiled eggs (insert monkey emoji covering eyes). I do however enjoy a runny egg yolk on my burger. I find that the soft egg yolk has much more flavor than it does when it is cooked. Anyone else feel me? On top of the egg I place a few slices of avocado. My favorite is when they are perfectly ripe and soft to the touch - excuse me while I wipe the drool off of my chin (LOL).
Now I usually skip the bun and wrap my burger in lettuce to take its place. However, I recently received the Whole30 book as a gift (thanks babe) and I found these sweet potato buns. I really like the flavor that sweet potatoes have because you can eat them plain or dress them up, both equally scrumptious. These were seriously so easy to make. All you do is heat up some coconut oil in a pan, fry the thickly sliced sweet potatoes on each side for about 4 minutes or until tender, top with a little bit of salt and voila you have a way healthier version of a classic bun for your burger. My burger was so large that I had to use a fork and knife to eat it but my husband dove right in and ate it like a typical burger. I wish I would've gotten pictures of it because it was quite hilarious.

I am always joking with my friends about how my husband is a very picky eater. Whenever I make something new his response is typically “great” and it is filled with somber undertones of sarcasm. I was anxious to hear his thoughts on these buns and to my surprise he loved them. He even ate the leftovers! If you have a picky eater, I encourage you to keep trying new recipes and foods with them. I’ve introduced foods to Jay that he never thought he would eat in a million years. Preparing fresh foods and cooking them correctly really makes such a difference when it comes to flavor.


How do you dress up your burger or make cookouts a healthier place to eat? Happy eating!