Tuesday, December 31, 2019

Winter Skincare Routine

With the winter weather in full swing, my skin is telling me that it is dry and it needs moisture or else it will retaliate with small breakouts and patches of dry skin. Anyone else? 

Today I am going to be breaking down my winter nighttime skincare routine to help lock in moisture and ensure my skin stays looking its best. I use all Beautycounter products for this routine but know that this is in no way sponsored or endorsed by the company. All reviews and opinions are my own. 

I love using Beautycounter for many reasons, the main reason being that the products work fantastic, but I love how transparent and responsible this brand is. Safety is at the heart of this company and knowing that anything I buy is safe to use on myself, my husband, and my future children is such a peace of mind. (Hey Beautycounter, when will you be releasing a dog line?) If you don’t know much about skincare safety laws and regulations I will give you a quick synopsis: there aren't many. Why is this a problem? Because there are more than 80,000 chemicals in the market today, most of which have not been tested for safety. If you’re interested in learning more check it out here

My skincare routine has 6 steps and it only takes me about 10 minutes. Everybody should make time for this, especially because taking care of that skin is so important! The first thing I do is wash my face with the Nourishing Cream Cleanser. I love how light this cleanser is and I use a pea size amount to wash my entire face. The first time I used it I used wayyyy too much. After I cleanse I pat my face dry and use a toner. I just started using the Countermatch Hydra- Gel Radiance Toner. Typically toners have alcohol in them which is why you feel that burning sensation after you use it. This toner has Benzyl Alcohol which is a natural form found in essential oils. You won’t get that burning or drying feeling that you get from a toner found at the drugstore. I use these reusable cotton pads because you can just throw them in the washing machine when you’re done. So much less waste! I let my face dry for a minute and then use the Resurfacing Peel all over my face and neck. This stuff is magic in a bottle! It has helped even out my skin tone and make my face feel baby bottom soft. Usually a peel you would leave on and then wash off, but not with this bad boy! You simply leave it on and let it work it’s magic overnight. I let that soak in for a few minutes, this is usually when I brush my teeth. Next I will go in with my eye cream. I have been using the Countertime Ultra Renewal Eye Cream and I really like how thick it is. You do not need to use much. I usually just dab my ring finger in the jar and tap that under my eyes. I then put on my nighttime cream which is the Countermatch Recovery Sleeping Cream. I like a thick sleeping cream because in the winter I get really dry. If you’re not a fan of a thick cream try a day cream, they are typically much lighter. I like this one. If I am feeling SUPER dry, like I have been lately, I will top my whole face off with an oil. I flip back and forth between Beautycounter’s No.1 and No. 3 oil. I like the No. 1 because it smells amazing, like a large orange was just freshly juiced into the bottle, but I like the No. 3 if I am experiencing any breakouts. 

I hope this is helpful on how to treat your skin in the winter. It is helpful to know your skin type when making decisions regarding the products you put on it. If you’re unsure take this skincare quiz to help you find the right products for you! Stay beautiful! Xoxo!

Wednesday, August 21, 2019

Prepping for a Race

I made it a goal in January to focus on a healthier version on me for this year. I picked up running back in October of 2018 and completed my first 5K. After that I did a couple more and signed up for a 10k, and then my first half in April. It was challenging but I did it! I felt so accomplished and proud of myself for running 13.1 miles of rolling hills along the beautiful Mystic coastline. Soon after this, one of my best friends and running buddy, said we should sign up for a full marathon. A full marathon is 26.2 miles to be exact and I thought she was crazy for thinking I could do that. After months of debating I decided to take action and sign up; your girl has either lost her mind or turned extremely confident overnight. I’ve been training for about a month now and have been loving how running is starting to come with ease. I have so much more running stamina than I did last fall and I am anxious and excited to see how the marathon goes in November! 

Before you leave this post because you’re thinking I could never do this, I can barely run a mile! Let me tell you that a little over a year ago I was in that same spot. I signed up for a 5k with my friend and immediately regretted the decision after I started training for my three mile race. Running a mile around my neighborhood was actually torture. I couldn’t even run the entire mile, I had to stop and walk at least half of it. I kept at it, and each time it got a little bit better. I could run an entire mile and then walk/run the next mile. By race time I had run 3 miles and yes it was hard but I did it! The same happened when I did the 10k. Each mile got a little bit easier but my body was also getting stronger and stronger. So go find a 5k, 10k, half or full marathon and sign up right now! YOU can do it just like I did! You’ll need a few things to help you along the way that I will share with you, but I’m guessing that’s why you’re here reading this :) 

First of all, I have to say I am at quite the advantage when it comes to training because I have an excellent motivational partner; which in my opinion is the first thing you’ll need. By no means is this a make it or break it need BUT it is so helpful to have an accountability partner. I am pretty strong minded when I set my mind to do something but it is always easier for me to run with someone than without. I recommend going a day or two without chatting so when you’re running together for 1+ hours you have a lot to say :) 

Another thing you’ll need is good sneakers. This seems like an obvious one but it actually wasn’t to me. I have plenty of sneakers but most were chosen based on how they looked and not how supportive they were for my feet. It was fine for 3-5 mile runs but beyond that I noticed my knees and shins were hurting so badly. I went to Fleet Feet and did the Outfitting Process. It really was so cool! They take all of these measurements and ask lots of questions and then bring out a few pairs of different brands that would be a good fit for your feet. I ended up getting these and they are the most comfortable sneakers I have ever worn! I highly recommend getting there if you’re experiencing any pain while running.

Now that you have your buddy and your sneakers you’re going to need a plan. How many miles will you be running each week? How many days? What about cross training? What is cross training?? Don’t fret, all you need to do know is here. I’m following the Hal Higdon method for training. I can’t take the credit for finding this method as my running partner, Anna, is the one who introduced me to it; see I told you having her was to my advantage! The runs gradually increase and consist of short runs during the week and a long run on the weekend. On the days that I rest I try to get in a long walk or a hike since that’s more manageable in the summer with dogs! I also love to go to spin classes which are great for cross training. It will get your heart rate up and strengthen those leg muscles!

You may want a few other things I will categorize as: running accessories. 
Something to measure your distance and pace. There are so many different tools you can use for this. If you’re going to use your phone I think the Runkeeper app is great for tracking mileage and pace. You can use it while listening to music or talking on the phone! If using your phone and training in the summer or warm weather you’ll want an arm band or belt to keep your phone safe. I have this one and like it but I don’t love having my phone on me. I have an Apple watch which I’ve found has been amazing for running because I don’t need to keep my phone on me to track how far I’ve gone or the pace that I’m running. 
Something to re-energize. I love these honey stinger chews. They give me a little boost of energy when I’m feeling like I can’t go on anymore. I also have been bringing these teeny water bottles along on my runs. It’s really good to use them for training if you will be using them during a race. I do not recommend trying something new the day of your race because you won’t know how it will affect your stomach! 
Something to listen to. I have been loving audible and podcast apps for running. Generally most podcasts are anywhere from 45-80 mins and can occupy your mind so you don’t get bored after a few miles of running. I have been listening to the Rise podcast by Rachel Hollis and I have been LIVING for it! She’s so motivational and inspiring! When I’m feeling confident in my running surroundings I listen to audible. I love a good thriller or mystery so I need to be in a place where I can’t get freaked out too easily. I highly suggest Stillhouse Lake. It was so good! I have so many other good thriller books that I’ve read - let me know if you want them.

I could probably write a few paragraphs about the clothing you should get for hot and cold weather training but I’ll save that for another post. I hope this was helpful and informative if you’re taking the next step to train for a race. Let me know if you sign up for one - maybe I’ll see you there :) Stay healthy! xoxo

Monday, August 5, 2019

Five Minute Makeup Routine

How is it already August?! I can’t believe the summer has gone by so fast!! I wish it would last longer but I have to say, I am beginning to be over this heat! While I love to bask in the sun by the beach, it isn’t as fun sweating it out in my backyard. Personally wearing makeup this summer hasn’t been my top priority. It’s been nice letting my skin breath and soak up the sun; safely of course! However, when I have been wearing makeup I’ve found a quick five minute routine that even the busiest woman can handle. You don’t need to be a skilled makeup artist to do this and most of it can be applied with your fingers, if you choose. It can be so fun to watch makeup artists on youtube but also quite intimidating with all of their steps, tools, and products. I use just nine products and honestly you could cut it down to six if you’re not as high maintenance as me :) 

Step 1: Prime. I always always ALWAYS recommend you prime your face. A primer helps your makeup go on smoother, last longer, and depending on the type of primer it can make your face more matte, dewy, or poreless. There are so many primers and I’ve tried a lot but I’ve taken all the work out of looking for you because I’ve found the best one. I did a whole blog post about it here. Since writing that post I have repurchased the full size bottle twice. I love it because it really hydrates my skin and adds a nice dewy finish to my look! I apply this to my face with clean hands and really make sure to cover my entire face. You only need one pump to get the job done. If you’re looking for something more matte I would recommend this. I liked it, but I really wanted something with better ingredients and a more dew finish!

Step 2: Tinted Moisturizer. I used to be a full coverage kind of girl. I loved a good foundation to cover EVERYTHING, until I realized I didn’t really need to cover everything. I started to feel like I was putting way too much on my skin and needed a bit of a change. I love this tinted moisturizer from Beautycounter. It has SPF 20, a light scent, and is super creamy. It definitely gives more of a glow so if you’re not into that, I would try this one. It’s similar but without the SPF. I put a few drops on my face and either rub it in with my hands or a damp beauty sponge. I wear it in the shade number 2. 

Step 3: Concealer. Let me preface this by saying I didn’t have high hopes for this concealer. I love a full coverage concealer, such as the Tarte shape tape, that brightens the under eye and gives the impression that you’ve slept for 12 hours. This Beautycounter concealer is in a pen form and has a small brush at the top where the product comes out. I thought that something so creamy and light could never match up to my full coverage shape tape - but I was wrong. I actually like this one so much better!! While it feels thinner, I actually need less product and it’s much easier to blend out because it’s not as thick. I use about two clicks of the pen and blend it in with a damp beauty sponge. It can also easily be blended with your finger, but I think it looks much more even when using a sponge. I have repurchased this twice and will continue to! I wear the shade light. 
Step 4: Bronze, Blush & Highlight. I put these three together because I do these almost simultaneously. I love them because they are all in stick form so it’s super easy to apply them. This is also where you can cut out a few steps if you’re not into looking like a bronzed and glowing goddess. Although reading that I am not sure why you would want to turn that down! I start with the bronze glow stick and do a couple of swipes under my cheek bones and the top of my forehead near my hair line. I use a damp beauty sponge to blend it in. Next I will go in with the cream blush and swipe it right on the apples of my cheeks and blend it with the beauty sponge again. Lastly, I take the pearl glow highlighter and swipe it right on top of my cheek bones, cupids bow, and nose. Then I blend it with, you guessed it, the damp beauty sponge! These three steps probably only take 1-2 minutes. It adds such a nice dimension to the face! 

Step 5: Brows. Do not be intimidated by a brow product- especially this one! I wear the shade medium but it also comes in four other colors, one of them being clear if you’re feeling unsure! I used a pencil to fill in my brows for years, and now that I’ve switched to a gel I can’t go back. It is so much easier and much faster than a pencil. The gel just sticks to your hairs so you can swipe it on without worrying about overdrawing. I love the tiny applicator tip because it’s much more precise! Beautycounter also has a pencil, which some people like to put on prior to gel. The gel will ultimately help to keep your hairs in place all day!


Step 6: Lash Primer & Mascara. I swear by a lash primer. It makes your lashes look much more full and helps the mascara to stick to your lashes. I’ve been all about safer beauty products so I switched to this lash primer by LashFood. I really like it and how it compares to the one I was using previously. I coat my lashes with this and wait a minute to let it get a little tacky before putting on my mascara. I will usually use this and do my brows while I wait. I coat my lashes two to three times with mascara to give it some extra volume! Unfortunately, I haven’t been able to find a nontoxic mascara that gives me the same results as my It Cosmetics mascara. Luckily there are no parabens and it rates fair on the environmental working group scale of safety. I LOVE a full lash look and I can’t give it up just yet. Anyone have a recommendation??  


That’s it, six steps to a healthy natural looking glow! Have you tried any Beautycounter makeup yet? Be sure to shop it here :) Stay beautiful and healthy!! xoxo

Wednesday, July 31, 2019

Vegetarian Lasagna

Hiiiii! It’s been awhile! We’ve been busy here; but all good things! I think I’ll do little life update post to introduce you to some new friends we have around here, unless you follow me on instagram than you already know :) In the meantime, I wanted to share a vegetarian lasagna with you! I love lasagna. It’s such a hearty and comforting meal. Best of all it usually brings leftovers. I don’t know what it is about leftover pasta dishes, but they are so much better than the first day. I think all of the filling has time to soak into the pasta and it just makes it that much more scrumptious!
I found this recipe in an old cookbook I got at a library book sale. Have you ever been to one? I got the entire Harry Potter book series for $5 - that’s insane! I digress. So I found this recipe and just gave it a few tweaks to fit my my husbands taste buds! Anyone else have a very picky eater at home? Please send me tips on getting your picky eater to try new things :) 


Recipe:
9 lasagna noodles 
1 small onion
1 small green pepper
2 tsps minced garlic
1 15 oz can tomato sauce
1 15 oz can crushed tomatoes (drained)
1 15 oz can cannellini beans rinsed and drained
1 tsp salt
1 15 oz container fat free ricotta cheese
3 cups frozen spinach thawed and drained
¼ cup shredded Parmesan cheese
6 oz mozzarella cheese thinly sliced or 1 ½ cups shredded mozzarella 

Step 1: Preheat oven to 350 degrees and spray a 13x9 glass baking dish with cooking spray
Step 2: Cook lasagna noodles. I used the noodles that cook in the oven with the lasagna, so skip this step if you’re using those! 
Step 3: Add onion, bell pepper, and garlic to a large frying pan. Cook until the onions become translucent. Add the tomato sauce, tomatoes, beans and salt to the vegetables and cook on medium low for 5 minutes. 
Step 4: In a separate bowl combine ricotta, 2 tbsp of parmesan cheese and spinach. Mix well.
Step 5: Scoop about one cup of the sauce mixture and pour it on the bottom of the glass baking dish. Lay three noodles on top. Next add about half of the cheese and spinach mixture and spread over noodles. Top with 2 cups of the sauce mixture. Layer three more noodles. Spread the rest of the cheese and spinach mixture on the noodles and pour remaining sauce on top. Layer the last three noodles.
Step 6: Cover the top of the noodles with the mozzarella cheese and the remaining 2 tbsps of parmesan. 
Step 7: Cover the baking dish with tin foil and bake for 35 mins. Remove tin foil and bake for an additional 10 minutes.

Let me know if you try this recipe! Stay healthy! xoxo


Monday, February 25, 2019

Monday Muse

Okay let me start this post by saying I’ve been trying to write this specific favorites post for two weeks now! It was supposed to go up this past Friday but halfway through the day I remembered I never wrote it- whoops! So instead of entitling this Friday Favorites I know bring to you Monday Muse, which is pretty much the same thing right? I’ve put together a few things that I have been loving lately that I think you will love too!
Sweetgrass Spray
I tried an essence and sound meditation a while back that I absolutely fell in love with. It is a guided meditation with the use of glass bowls for sound and a variety of essential oils. The whole experience is incredible. At the end of the meditation sweetgrass is sprayed on your body. Ladies, it was love at first sniff. I told my aunt I really wanted some and she searched high and low and surprised me with it for my birthday last summer. I was so happy! I keep it by my bed and spray it almost every night to cleanse the room and invoke positive energy.
If you’re into makeup and skincare at all then you probably know the brand Drunk Elephant. It is very high end and the prices can be a bit deterring but it is a clean beauty brand that uses additive free ingredients. While they are not as rigorous about testing ingredients as Beautycounter, they have banned 6 ingredients- which they call the “suspicious 6”-  and choose to focus on pH level and biocompatibility of ingredients in their products. I was looking into a lip balm and theirs is highly rated, so I gave it a try. It is becoming a new favorite of mine. I love how fat the actual stick is and that it is scent free.
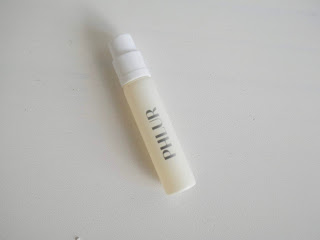
Do you know how many people I have talked to about this perfume? I’ve told you before I’m a product pusher when I really love something. I was searching for a clean perfume that wouldn’t be harmful to my skin but that would also smell good for more than an hour. I stumbled upon this company and loved that you could try three samples for just $18 and then use that $18 to purchase a full size bottle. I absolutely love the scent Hanami. It is so feminine with floral, sandalwood, and fig undertones. I haven’t purchased the full size yet because I am working through the other samples, but I don’t love them as much! They also have candles and body lotion which might be next on my list to purchase!
Okay you’ve seen these everywhere. All of the celebs and many fashion bloggers have the real deal but unfortunately I don’t have $6,000 to drop on a bracelet at the moment. Good for you if you do, but if you don’t I’ve found a really great dupe! It’s $13 and on prime! I love the color, quality and style of this bracelet and it fits in really well with the other bracelets in my stack. I want to get a ring next!

I shared these in my Fall favorites but I am sharing them again. I still love wearing these bracelets and the I can’t get over the high quality. I have the Beckham and the Lexi bracelet which I highly recommend. It’s a great way to build up your bracelet stack, and they have sales on their site quite often!

What are you crushing on lately? I’d love to know!! Stay beautiful! XO.

Wednesday, February 20, 2019

Natural Makeup Remover Wipes

Happy Wednesday!! Halfway through the week already?? I was laid up with strep all weekend so I will be happy when this weekend comes and I can actually enjoy my time at home. I am totally over this winter season and desperately need to air out my house and hit the refresh button for Spring!

In trying to stay healthy I have been using a lot of essential oils, many of which have multi purposes. For my birthday last year my aunt made me makeup remover wipes which contained essential oils and I was obsessed with them and wanted to recreate them so you ladies could try them too!
The ingredients are very simple: 2-3 tbsp witch hazel, 4 drops each of lavender, frankincense, and melaleuca essential oils, ¼ cup of water, and 20ish cotton rounds! I just used however many cotton rounds could fit in the jar I used. You can use any size glass jar - I used a jelly jar because that’s what I had on hand. I chose these three oils because they each do something different for the skin.
Witch Hazel: This is the astringent part of the makeup remover wipe and it also contains a toner. I am a big advocate for using a toner because it helps to remove any leftover oils that are still on the skin. I like this one because it is scent free and contains no alcohol.
Lavender: I love the smell of lavender and use it all the time. It has such a calming scent to it. I used it in this makeup remover because it can help to reduce the appearance of skin imperfections. If you have sensitive skin, I suggest adding a little bit of fractionated coconut oil to the wipes to help dilute it more.
Frankincense: This oil is known as the “king of oils” and has many benefits for overall wellness. I used it specifically because it helps to soothe and rejuvenate skin.
Melaleuca: This is one of my favorite oils because it helps to promote a healthy immune system. I use this all throughout the winter! I used it in the remover wipes because it helps to cleanse and purify the skin to support a healthy complexion.
You’ll combine the oils, witch hazel and water in a small bowl and mix them together. Pour half of that mixture into the glass jar and put the cotton rounds on top. Pour the rest of the mixture on top of the cotton rounds. That’s it! Super simple and a safe way to take off all your makeup from the day. DISCLAIMER: DO NOT USE THEM ON YOUR EYES. Since these do contain oils it would not be good to put them on your eyes as it would cause extreme discomfort. I recommend this eye makeup remover from Beautycounter. I wear a lot of mascara and this takes everything off in one or two wipes.  

These wipes smell amazing and leave your skin feeling clean and refreshed. Let me know if you try them! Stay beautiful! XO.

Wednesday, February 13, 2019

Say Goodbye to Dry Skin


I don’t know how Spring is supposed to be coming two weeks early with all of this snow talk around here. I love a good snow day but I also love being out of school during the summer. Last year school went soooo late but this year we have a pretty good chance of making up for that. I’m hoping this storm will be one of the last *knocks on wood* we see this winter.

With the cold weather comes another dreadful thing: dry skin. And I mean really dry skin, in places you didn’t even know you could get dry skin! Random patches on your shoulder, in between your fingers, and your derriere - which, in my opinion, is by far the worst! My husband suffers from really dry skin during the winter months and his scratching drives me absolutely insane. I’ve never felt more rage than being woken at 3 a.m. to the sound of intense scratching, does this happen to anyone else? I know some of you must be experiencing my pain!! I seriously feel bad for him and his skin, and trust me we’ve tried so many different things to fight it. I switched to a cocoa butter body wash last winter and cocoa butter body lotion but neither did the trick. I even tried an oatmeal body wash! This year I decided I’ve had enough with trying to solve the problem with fragrance filled lotions and soaps that leave you with empty promises of nourished and moisturized skin. I’ve found three products that have worked really great for me and my husband.

I am not exaggerating when I say that this is the only moisturizer that has helped to soothe Jay’s dry patches of skin. Every night he would liberally apply lotion from top to bottom and he would still wake up with red marks from scratching most nights. I was almost at my breaking point when I decided to purchase this beauty and give it a go. I had heard incredible things on how it had helped people with really bad patches of eczema so I was very hopeful it would help. There are three things I love about this product. 1: it is made with safer, non-toxic ingredients. I’ve slowly been switching out most of our personal care products to non-toxic brands which has really been a priority for me over the last few months. I almost feel guilty putting anything else on my body - but more on that in Friday’s post! 2: it is effective without feeling overly thick and slimy. There’s nothing worse than slathering on lotion and then feeling like you might slip off whatever you sit on due to how slick your arms and legs feel. With the countermatch lotion it is rich yet rapidly absorbing so your skin gets everything it needs and nothing it doesn’t. 3: a little goes a long way. I feel like I say this about every Beautycounter product but it’s true! I use one pump for each limb and it does the trick which I think offsets the $39 price tag but I would honestly pay double that because of its effectiveness.  

If you’re looking for something that soothes dry skin but also smells decadent this lotion is the one for you. It contains a moisturizing blend of marula, mongongo, and safflower seed oils, plus shea and jojoba butters. I like to use this one during the day because the smell is to die for! You feel like your on a tropical vacation - which in these cold winter months is a dream. I love to use this sugar scrub first and then lather on the lotion to seal in the softness.

This is my favorite thing to use on my hands when they are super dry. I like to use it overnight because it is very thick and sticky. I don’t generally like the feel of that but I find this is the only way to cure my dry and cracked hands. After a few night use my skin is back to normal! Growing up I used this stuff all. the. time. It was one of those staple products that cured basically every cut, bruise, and dry spot on the body.

What are your favorite products to use for dry skin? Have you tried these products? Stay healthy! Xo.

Monday, February 11, 2019

Clean Cleaning Products

Happy Monday! I love the weekends with my little family - but they go by way too fast. I spent the weekend cleaning and spending time with my husband. Jay and I decided to celebrate Valentine’s Day early and went to THE best restaurant on Saturday night. I ate too much food and indulged in a dessert but it was worth it. Our sweet pup is having surgery on Valentine’s Day so we will be giving her all of our love that day.

While I was cleaning I decided it might be fun to share how I’ve switched most of our cleaning supplies over to more natural and safe products. I have been using and loving the brand Mrs. Meyers. If you haven’t heard of it I am sure you’ve at least seen it; if you are a frequent Target shopper like me! At first I was hesitant to try these products because I was using a bleach based cleaner for the bathroom and a disinfectant cleaner for the kitchen. I was skeptical about the power of a plant based cleaner but I gave it a whirl and haven’t looked back.

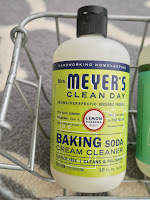
First let’s talk about the Lemon Verbena Baking Soda Cleaner. This stuff is magical! If you have an electric stove you know about the burnt on food and water marks that get left behind after a night of cooking. I could not for the life of me get rid of these marks with my kitchen cleaner and I was about to take a razor blade to it - anyone else’s grandmother do this? Well I decided to try the baking soda cleaner because it had some grit to it and boy did it do the trick! I lathered it all over the stove top and then used a scrub daddy (if you don’t have one you are seriously missing out) and all of the burnt junk came right off! I also use the baking soda cleaner on my tub, kitchen sink and bathroom toilets and it works like a charm!

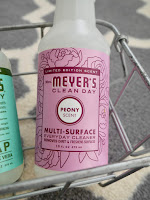
The second product I am obsessed with is the Peony Multi-Surface Everyday Cleaner. It smells just like a peony, which is why I love it so much. I use this cleaner on my countertops, dining room table, and sinks. I always hated using the disinfectant cleaner because I felt like I was left smelling that harsh chemical smell in my nostrils for hours. I always associated the bleach smell with 100% clean but plants and essential oils have a lot of the same disinfectant power. My bathroom has never been so clean and smelled less like bleach!

The last product is my newest edition but I’ve already repurchased it - the Basil Hand Soap. This basil scent smells so fresh and sweet, it’s hard to not tell you that I am also obsessed with it because I totally am! I ordered a three pack on Amazon last month and stuck one in every bathroom. It gives your hands a good clean without drying them out.

The next products I am looking forward to purchasing are the dish soap and the glass cleaner. I think the scents honeysuckle and lilac will be my next fragrance choices. Have you tried any other clean cleaning products? I’d love to know which ones you like and would recommend! Stay healthy! Xo!